Wednesday 6 July 2011

Creating a Server Monitoring Graph in XenApp 6.0 and 6.5

Knowing what is going on in your Citrix farm is always difficult when there are more than a few users and servers involved.  Edgesight is very useful for this in XenApp, but it does lack a decent Dashboard function so you can tell at a glance what the load is like on your servers.

In previous versions of Citrix I’ve seen people write applications which use MFCOM to find out how many sessions are on each server and write them out to a nice graph – you can then see at a glance whether for instance everyone is on one server, or if a server appears to have rebooted or been left disabled.

Citrix Server Graph


The way I do this currently is using a PowerShell script, running as a scheduled task.  This then creates image files which I can display in a webpage.

In this earlier article I showed how you could download and install the Citrix components into PowerShell and use it to control the farm.  Its worth doing this, and also using the PowerShell ISE Editor to write your PowerShell scripts.

You should also download something that will let you create graphs from PowerShell.  An easy and free way of doing this is the MS Chart Controls for .NET 3.5 download.  You can download this from here:
http://www.microsoft.com/download/en/details.aspx?displaylang=en&id=14422

The first step is to use Powershell to get a list of the server names that you are interested in, and a list of the active sessions on the farm.  Install the XenApp Powershell SDK from here and run the following from a farm serer. The first line is required to load the Citrix add-ons you just installed to PowerShell:

Add-PSSnapin Citrix*
$filter = 'xen'
$servernames = Get-XAServer | where-object {$_.ServerName -match $filter} | select-object ServerName
$sessionsactive = Get-XASession -Farm | where-object {$_.State -eq "Active" -and $_.ServerName -match $filter}

The value of $filter can be edited to filter on server name – only server names including that string will be measured.  If you set it to just be ‘’, all servers will be used.

This should give you a pair of arrays, $Servernames and $sessionsactive, containing all the names and session details.  Now we can iterate through the server names, finding out the number of active sessions for each on and writing it to another array, then finally sorting that array into alphabetical order by server name:

$servercounts = @{}
foreach ($servername in $servernames)
{
    $countActive = @($sessionsactive | where-object {$_.ServerName -eq $servername.ServerName }| Select-Object SessionId -unique)           
    $servercounts.add($servername.ServerName, $countActive.Count)
}
$servercounts = $servercounts.GetEnumerator() | sort Name

You now have an array called $servercounts.  If you ran it and exported its contents it would look something like this:                      

Name      Value                                                           
----      -----
XEN01     28
XEN02     30
XEN03     31
XEN04     28
XEN05     28
XEN06     29
XEN07     28
XEN08     29
XEN09     27

Finally, time to generate the chart, if that is what you want.  To use the MS Chart Controls (which will need to be installed on the XenApp server too) add these lines to the top of the script:

[void][Reflection.Assembly]::LoadWithPartialName("System.Windows.Forms")
[void][Reflection.Assembly]::LoadWithPartialName("System.Windows.Forms.DataVisualization")

Then add these lines to the end of the script to create the graph and save it to the c: drive as a PNG file.  Note the lines to create a title for it as well, so you know whether the image is out of date:

# create chart object
$Chart = New-object System.Windows.Forms.DataVisualization.Charting.Chart
$Chart.Width = 900
$Chart.Height = 330
$Chart.Left = 10
$Chart.Top = 10

# create a chartarea to draw on and add to chart
$ChartArea = New-Object System.Windows.Forms.DataVisualization.Charting.ChartArea
$Chart.ChartAreas.Add($ChartArea)
[void]$Chart.Series.Add("Data")
foreach ($server in $servercounts)
{
    $dp1 = new-object System.Windows.Forms.DataVisualization.Charting.DataPoint(0, $server.Value)
    $dp1.AxisLabel = $server.Name
    $Chart.Series["Data"].Points.Add($dp1)
}

$title = new-object System.Windows.Forms.DataVisualization.Charting.Title
$Chart.Titles.Add( $title )
$Chart.Titles[0].Text = date

$Chart.SaveImage("c:\Graph\XenAppFarm.png","png")

The script is best being signed (or remove the need for signing in PowerShell scripts) and then needs to be scheduled.  I do this with a scheduled task on a XenApp server, which calls a batch file with contents of:

call powershell -command "& {C:\Graph\Generate.ps1}"

Finally you need a way of viewing the image – I just use a HTML file with an automated refresh, such as this:

<html xmlns="http://www.w3.org/1999/xhtml">
<head>
    <title>XenApp Farm</title>
    <meta http-equiv="refresh" content="60">
</head>
<body>
    <img src="c:\Graph\XenAppFarm.png">       
</body>
</html>

Just to recap, here’s the whole sample script:

# load the appropriate assemblies
[void][Reflection.Assembly]::LoadWithPartialName("System.Windows.Forms")
[void][Reflection.Assembly]::LoadWithPartialName("System.Windows.Forms.DataVisualization")
Add-PSSnapin Citrix*

# get the server names and sessions
$filter = ''
$servernames = Get-XAServer | where-object {$_.ServerName -match $filter} | select-object ServerName
$sessionsactive = Get-XASession -Farm | where-object {$_.State -eq "Active" -and $_.ServerName -match $filter}

$servercounts = @{}

# count active sessions for each server name
foreach ($servername in $servernames)
{
    $countActive = @($sessionsactive | where-object {$_.ServerName -eq $servername.ServerName }| Select-Object SessionId -unique)           
    $servercounts.add($servername.ServerName, $countActive.Count)
}
$servercounts = $servercounts.GetEnumerator() | sort Name

# create chart object
$Chart = New-object System.Windows.Forms.DataVisualization.Charting.Chart
$Chart.Width = 900
$Chart.Height = 330
$Chart.Left = 10
$Chart.Top = 10

# create a chartarea to draw on and add to chart
$ChartArea = New-Object System.Windows.Forms.DataVisualization.Charting.ChartArea
$Chart.ChartAreas.Add($ChartArea)
[void]$Chart.Series.Add("Data")

# add a data point for each server
foreach ($server in $servercounts)
{
    $dp1 = new-object System.Windows.Forms.DataVisualization.Charting.DataPoint(0, $server.Value)
    $dp1.AxisLabel = $server.Name
    $Chart.Series["Data"].Points.Add($dp1)
}
# set the title to the date and time
$title = new-object System.Windows.Forms.DataVisualization.Charting.Title
$Chart.Titles.Add( $title )
$Chart.Titles[0].Text = date

# save the chart to a file
$Chart.SaveImage("c:\Graph\XenAppFarm.png","png")

Resources used to write the above include:

http://blogs.technet.com/b/richard_macdonald/archive/2009/04/28/3231887.aspx
http://msdn.microsoft.com/en-us/library/system.windows.forms.datavisualization.charting.seriescharttype.aspx

XenApp 6 – Hotfix 068 fixes UI and server capacity issues
Citrix released Hotfix XA600W2K8R2X64068 last week – available here: http://support.citrix.com/article/CTX129741

This interestingly includes several previous hotfixes, including the quite recent public hotfix 056, which improved the stability XenApp 6.0 considerably, especially when combined with Windows 2008 R2 SP1.  This fix therefore now addresses 13 separate issues.

Most interesting in the list of new fixes for me are those relating to screen flickering, windows maximising over the taskbar and poor server performance over about 70 connections:

  • Dock bars of published applications might overlap and obscure the local Windows Taskbar. This is the server-side component of the fix. To resolve the issue in its entirety, you must also install a client-side hotfix that contains Fix #206851.
    [From XA600W2K8R2X64068][#210857]

  • Certain applications can perform slowly when run in seamless mode.
    [From XA600W2K8R2X64068][#257490]

  • The CPU consumption of the winlogon.exe process can be higher than usual and cause new connection attempts to fail once a server hosts 70 connections or more. Eventually, servers can experience a fatal exception and need to be restarted.
    [From XA600W2K8R2X64068][#LA0032]

These issues have been seen on and off since we starting to run large number of user sessions on XenApp 6 servers.  Anecdotally, the issue of the Start Menu being obscured by Citrix sessions is quite widespread (though obviously more of an annoyance than anything).  We know that sessions can flicker when being shadowed using Remote Assistance or SCCM if the client version is older than v12.1 – hopefully this is also fixed now. The last one, servers behaving badly with over about 70 connections, is also just what we have seen, with far less user density (number of user sessions on each server) possible than we expected to be the case from benchmarking. We’ll allow more sessions now and see whether the servers behave better.

Incidentally, the “client-side hotfix that contains Fix #206851” mentioned in some of the issues fixed was included in the Citrix Online Plug-In v11.2 and is presumably in later releases as well.

Monday 4 July 2011

Installing XenApp 6.5 Tech Preview - Part 4 – Configuring the farm

This is a test build of the new Tech Preview of XenApp 6.5 from Citrix.  In the previous parts of this guide we set up a License server, Web Interface server and built the farm’s Data Collector, establishing the farm and its data store.

In this part we’ll continue this process by configuring the Web Interface and the first published applications for the farm.  To be honest, this is all highly reminiscent of the process to configure the Web Interface and publish a simple application that was in XenApp 6.  If you’re familiar with it, you should know all this already. 

Logging onto our Web Interface box again we launch the Citrix Web Interface Management console from the Start Menu

image

In this we have no sites created yet, and we’re going to create one site under XenApp Web Sites (used for the web interface) and XenApp Services Sites (used for the  Receiver client to create links in the Start Menu and on the desktop.

image

Creating a XenApp Web Site

Right click on XenApp Web Sites and click Create Site.

I’m happy with the name of the site, but I want to just type the server name in IE for it to work, so I click “Set as the default page for the IIS zone”.  If there were multiple web interface sites, only one would want this on.

image

The point of authentication is simple since this is just an internal web interface site, so the default of “at web interface” should be fine.

image

A couple more screens of clicking Next and I can configure my new site, providing the name of the first farm server I just built.

image

On the Authentication Methods screen I just leave it as Explicit as I just want it to ask for a username and password.

image

I then restrict it to just my AD domain, choose the Full logon screen appearance (apparently it will look like this…)

image

The full interface gives some options to change the language and the reconnection options after logon.

Then I choose just “online” apps since I don’t stream to clients, then we’re all done with the web site creation.

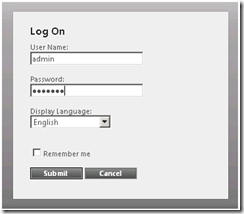
After this I open a browser and go to my server, at http://xensvr02/ – it takes ages the first time and seems to be hung on “Loading…”, but it works after that and is super fast next time.  I can log in okay (since I specified my domain name earlier I don’t need to enter that as part of my username) and I am told, quite correctly, that there are no resources available.

image

Creating a XenApp Services Site

Back in the main console of the Web Interface, I right click XenApp Services Sites and click Create Site.  The default names are fine – interesting that Citrix still use the phrase “PNAgent” here, its been abandoned in most other places…

image

Next, Next, Next and configure the farm again.  You can go in again later and add multiple farms by the way.

image

I choose “online” applications again and click through to the end of the wizard.

Publishing the first applications

When I learn a new programming language I always write a “Hello World” app first.  When I produce a new Citrix farm I always publish Notepad first!

Log back on to the Data Collector we installed earlier.  I’ve already set up the AppCenter (the new name for the Delivery Services Console), by loading it from Administrative Tools > Citrix > Management Consoles > Citrix AppCenter and choosing to add the local computer.  You should see the new farm name under XenApp in the tree on the left.  Click Applications and it should be empty.  Right click and click Publish Application

image


Click Next and enter Notepad as the Display Name.  Click Next and the following screen is the same as on XenApp 6 – apps can still stream to server, to client, be hosted or be content or a desktop.  The default (“accessed from a server” – a tradition hosted application) is what we need

image 

Click browse to find c:\windows\system32\Notepad.exe and it should fill in the command line and working directory. 

image

The next questions are all easy (servers to publish on – there’s only one and no Worker Groups yet, so I pick that server, then my own account to see the app).

I can now log into my Web Interface site and see a nice Notepad icon. 

image

When I launch it I get the expected notice that this is a technical preview license – after that, Notepad comes up – quite quickly actually…

image

Publishing the AppCenter

I’m not going to want to keep logging on to the Data Collector to use the AppCenter, so I publish that too.

This is the same process as before, it is “accessed from a server”, with the following target:

"C:\Program Files (x86)\Citrix\Citrix Delivery Services Console\Framework\CmiLaunch.exe"

image

This works very nicely and I now have a published AppCenter. 

Now we have a working farm I’m going to check out some of the new features of XenApp 6.5 – more soon.

Sunday 3 July 2011

Installing XenApp 6.5 Tech Preview - Part 3 – Establishing the Farm

Building on our production of a license server (here) and web interface box (here) which can support XenApp 6.5 Tech preview, we’re now going to establish a new farm with the installation of the server which will become the Data Collector and the server hosting the management tools.

Please note this cannot be installed over a remote desktop.  If its a VM, use the console (through XenCenter for instance), if its a physical machine, use ILO or a monitor, keyboard and mouse plugged into the box, at least until the main install is complete installed.

First, build your server – Windows Server 2008 R2 SP1 with a static IP (not DHCP).

Run Autorun.exe from the root of the installer share you created from the downloaded ISO of XenApp 6.5 Tech Preview.

Click Install XenApp Server

image

Click Add Server Roles

image

Choose your server edition (I’m personally installing Enterprise, so this will not cover Platinum only features)

image

Accept the EULA and click Next, then select just the XenApp role

image

You can now select the components.  You might choose different options to me so its worth a look.  First, take a look at the options:


image

Personally, I’m not using Single Sign-On, so I don’t select that (though it will STILL install the admin console anyway).  I don’t use Power and Capacity Management either, so I don’t use install the Agent.

I do use Edgesight on production systems, but this being a test system I’ll skip the Edgesight Agent too.  I’ll take a look at the new version of Edgesight separately.

The XML Service IIS Integration is automatically checked if you have IIS installed, where XenApp and IIS share a local port (80 by default).  If you check it, IIS will be installed and configured in this way.  But if you don’t have or need IIS on your XenApp servers (why would you?) and don’t need the extra features IIS has over the Citrix XML Service (like encrypting web traffic), don’t select the Integration checkbox.  There’s a useful discussion of this feature on this Citrix Forums thread:

http://forums.citrix.com/message.jspa?messageID=1542227

Leave the default components selected (we want the Management Tools on this server and we’re going to have a look at the new Windows Desktop Experience Integration feature.

Click Next, Next and Install to begin the installation. 

image

You may get this popup to install device software, it might be more simple if you click “Always trust software from ‘Citrix Systems Inc’”

Because this install has been launched from Autorun rather than a script, all the pre-requisites and server roles will be installed for you.  Note you’ve not been asked for Farm details yet – like XenApp 6.5 you install XenApp first into an unconfigured state and then choose whether to join or create a Farm.

Click finish at the end of the wizard and click Specify Licensing, then enter the name of the license server you created in Part 1

image

Click Test Connection and it should be successful, then choose the licensing model.  Since this is not a XenDesktop trial, choose XenApp, which should be listed as Recommended.

image

Click Apply and you should have a nice green tick by Licensing.  Now select Configure.

image

You can now choose whether to join an existing farm or create a new one.  Click Create

image

Then enter your farm name and your own domain account to be the administrator.

At the next section you can choose to have a local SQL Express database (just for test farms or companies who don’t even have a SQL Server), or connect to an existing Database which you should precreate on a SQL Server box.  See this link for Citrix’s recommendations regarding the database server.  For this test I’m going to use the New Database option to install SQL Express 2008 on this server.

image

Choose the shadowing model you want.  Make sure you get this right as it can override what you might choose later on.  Personally I am hoping that shadowing will work properly in XenApp 6.5 and not require you to mess about with Remote Assistance instead.

image

On the next screen we can choose more options for this installation.  Note the first options, to have a Controller or Session Only server – this is a new feature, where servers can be installed without the components to be a Data Collector (both types of server are capable of hosting published applications).  They’re greyed out because this server needs to be a Controller because its the first one.

image

Click the XML Service and you can change the default XML port.  Unless you have a reason to change it (maybe you’re hosting websites on your XenApp server?!), leave it as port 80.

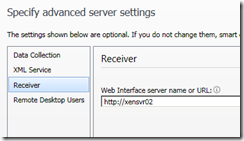
Click the Receiver tab and you can specify the Web Interface URL that you set up in Part 2 of this guide.

image

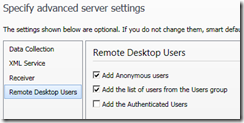
Click Remote Desktop Users and you can change the default user groups who can log onto the server in remote sessions.  I always untick Add Anonymous Users, which unless you actually want to allow unauthenticated use of Published Applications you should too.  Authenticated Users are anyone with a domain logon, though if the Users group contains Domain Users, they’re already going to be allowed in most environments.

image

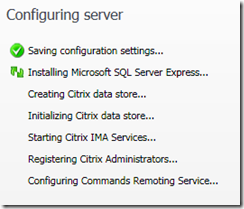
Click Next and Apply to set up the Farm…

image

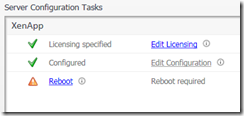
Then click Reboot at the end…

image

After the reboot, log in as the account you specified as the administrator (your own account maybe?) and launch the new Management Console – the AppCenter.  Citrix have done their level best to hide it by giving it a new name and putting it in the Administrative Tools folder!

image

When you launch it and attempt to discover the farm, you might get a message about the Single Sign-On Console – if you are not using this, go to Control Panel, Programs and Features and select the Citrix Single Sign-On Console, right click and Change, Remove, Next, Next and Finish.  If you ARE going to use Single Sign-On, don’t do this!

image

Launch the AppCenter and you should see the Discovery Wizard automatically appear.  Choose Add Local Computer and you should finally see your new farm.

In the next part we’ll look at configuring the Web Interface and publishing our first apps.

Installing XenApp 6.5 Tech Preview - Part 1 - License server

Following on from my overview of the XenApp 6.5 Tech Preview (http://zenapp.blogspot.com/2011/07/xenapp-65-tech-preview.html), I am now going to build a demo farm and explore some of the new features.

For this demo I'll be building a basic set of servers, based on a fairly powerful server running XenServer and 4 virtual machines - a license server, a web interface and an application server.

  • xensvr01: License server
  • xensvr02: Web Interface
  • xensvr03: Data Collector
  • xensvr04: Application server

The first step for me is the License server - its specified during the setup of the main servers, so its nice to have it in place first, and XenApp 6.5 will require a later version of the Citrix License Server than the v11.6 License server which shipped with XenApp 6.

Step one has to be to download the files we'll need – I’ll assume from here on in that this is done and they’re extracted to a nice file share somewhere your servers can all access.

All servers built for this are Windows Server 2008 R2 with Service Pack 1 (so they’re all 64 bit, as 2008 R2 is 64-bit only). They've all got static IPs and anti-virus programs installed, but otherwise are fresh installs.

To set up the license server, I go to my installer share on my first server and execute \Licensing\CTX_Licensing.msi

Accept the EULA and click next until it finishes...

image_thumb2

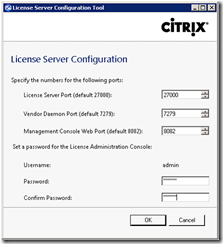
You then get a screen to configure the basics of the license server, and I'm keeping defaults. If you vary the license port, do remember what you change it to! Try to remember the “admin” password as well if you can. :-)

image_thumb5

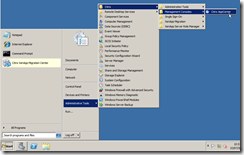
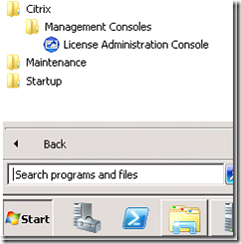
Click the Start Button and select Citrix, Management Consoles and License Administration Console

image_thumb7

Click the Administration tab and enter your admin username and password you set up earlier...

image_thumb10

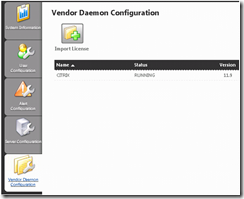
Click Vendor Deamon Configuration (catchy...) and click import license

image_thumb13

Click Browse and find the license file you downloaded earlier - this is a time limited evaluation license, it should have the expiration date in its name. Click Import license and you should get a nice green message.

image_thumb16

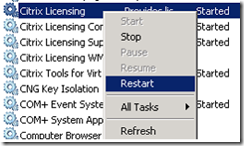
As it says, you need to restart the Citrix License service to get the licenses. Click Start, Administrative Tools, Services. Find the Citrix License service and give it a bounce.

image_thumb19

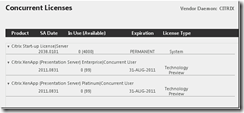
Go back to the Dashboard on the web page and you will see you have 99 Platinum and 99 Enterprise concurrent licenses, plus 4000 startup licenses. Interestingly, this seems to be a reduction from the 5000 servers the older license server supported...

image_thumb21

And that's it! Not even a reboot in sight. Bear in mind that you also need Terminal Services (sorry, Remote Desktop Services) licenses, though of course RDS has a 120 grace period on a newly built server, which is plenty for this test. I tend to combine RDS License and Citrix License services on a single server in production, though there's no requirement for this.

Next phase is to get a Web Interface server up and running, then we can actually establish the farm.

Installing XenApp 6.5 Tech Preview - Part 2 – Web Interface 5.4

Continuing my build of a demo XenApp 6.5 Tech Preview farm, I’m running through the setup of the new Web Interface, v5.4. In truth there’s nothing new in the initial phase of this setup so first I’ll have a look at what Citrix have to say on the subject.

The Citrix eDocs site for this version of the Web Interface is here: http://support.citrix.com/proddocs/topic/web-interface-impington/wi-library-wrapper-impington.html

New Features:

Updated end user interface. The layout and color scheme for end users has been updated to help improve navigation and readability.

Session sharing for VM hosted applications. The Web Interface now supports session sharing for Virtual Machine (VM) hosted apps. This feature is only available for seamless applications and non-anonymous users.

Multiple desktop access for users. In previous versions of the Web Interface, users could only access a single instance of a desktop per desktop group. Now, users can access multiple instances of desktops in desktop groups. For more information about assigning desktops to users, see the XenDesktop version 5 documentation.

Improved smart card support for Access Gateway. Smart card authentication to the Web Interface is now compatible with more environments. The Web Interface can now accept User Principal Names (UPNs) from Access Gateway as well as the user name and domain. Additionally, the Web Interface has been updated to comply with FIPS. This new functionality can only be used with the pass-through authentication for smart card option and you must be logged on as a domain administrator. For more information about configuring smart card support for Access Gateway, see the Access Gateway documentation.

Ability to set additional default values. Administrators can configure default values for all bandwidth-related settings, such as audio quality, color depth, bandwidth profile, printer mapping, and window size.

ICA File Signing. The Web Interface digitally signs generated ICA files, to allow compatible Citrix clients and plug-ins to validate that the file originates from a trusted source.

Before we can install the Web Interface, we need the J# Redistributable, which is not installed by default. Its on the XenApp 6.5 DVD though, so run it manually from here (use the 64-bit one if this is Windows Server 2008 R2):

\Support\JSharp20_SE\vjredist64.exe

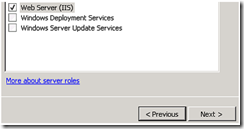
On J# is installed, run Server Manager from Administrative Tools. Right click Roles, Click Add Roles. Assuming it is not installed, select Web Server (IIS) on and click Next.

image_thumb12

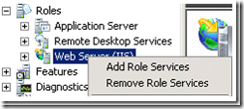
If Web Server (IIS) was already installed, select it in Server Managed (under Roles), right click and select Add Roles Services.

image_thumb10

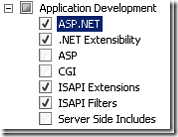
Leave the defaults selected, but turn on ASP.NET if not on already (agreeing to the other components turned on by this)

image_thumb2

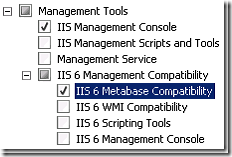
Then scroll down to Management Tools > IIS 6 Management Capability and turn on IIS 6 Metabase Compatibility too.

image_thumb3

Click Next and Install to install IIS with the IIS 6 Metabase option. If you miss these components, the main Web Interface install will fail with a message telling you what you need on.
From the XenApp 6.5 installer file share, find the "Citrix Receiver and Plug-ins" folder in the root of the folder and copy it to the local drive of your new Web Interface server.
Execute \Web Interface\WebInterface.exe from the file share.

Select your language and agree to the EULA.

On the Location of Clients page, click "Copy the clients to this computer" and enter the location of the "Citrix Receiver and Plug-ins" folder you copied in earlier

image_thumb9

Click Next and Next to install.

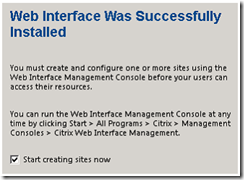
After Install (should only take a few seconds) leave the checkbox to Start creating sites now selected and click Finish

image_thumb7

At this point we can’t go any further without creating the farm, so we’ll come back to the Web Interface setup in a while